After Images

After Images 
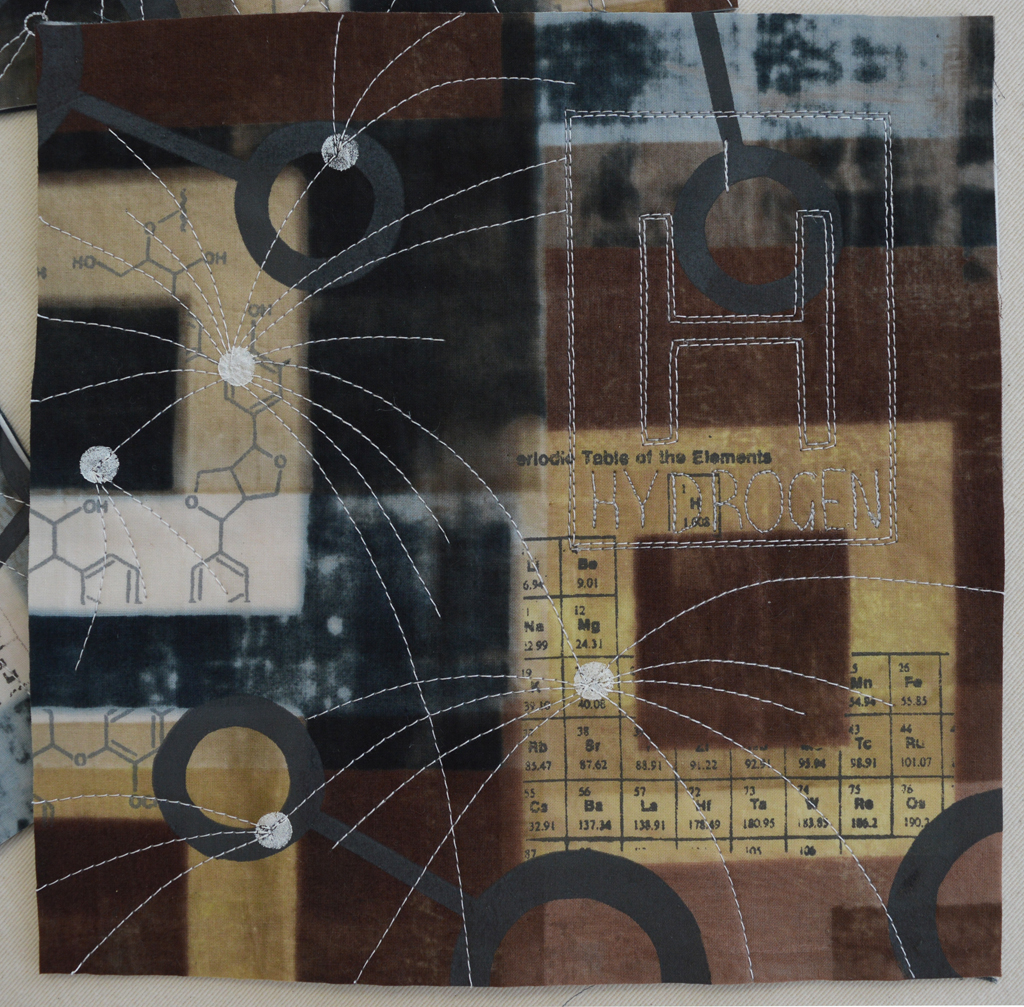
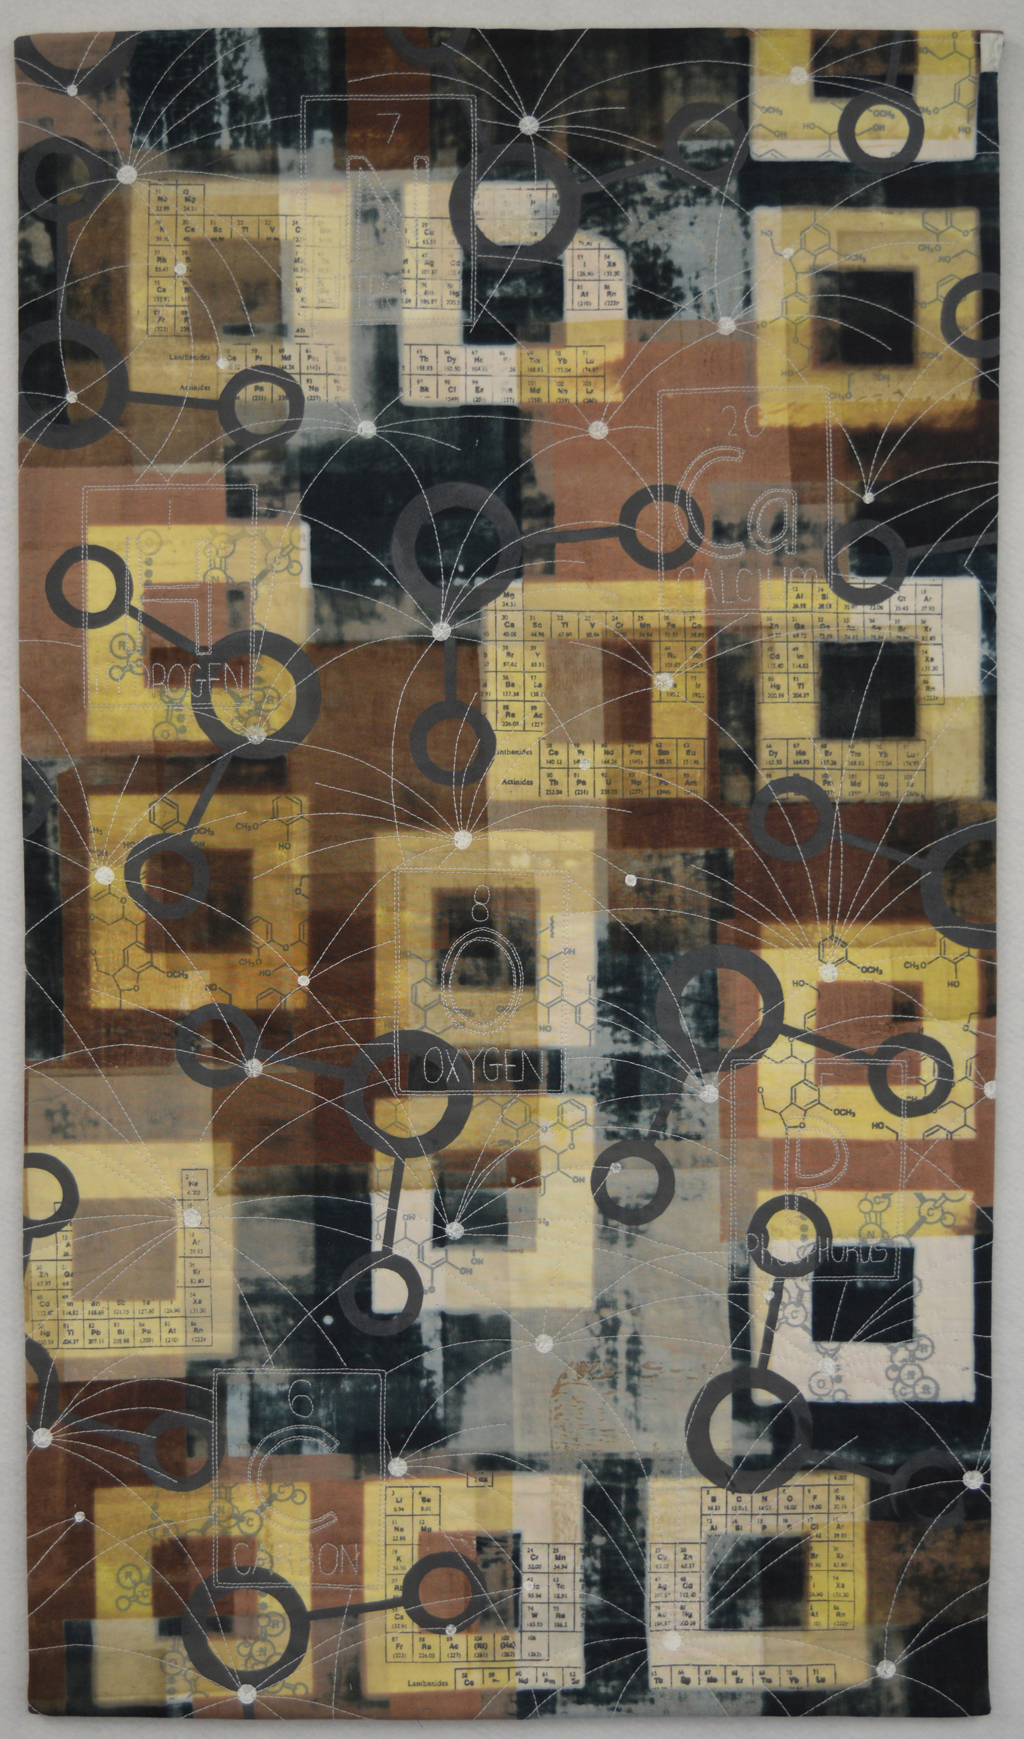
This weekend I finished After Images. I have entered it into the Contemporary Quilt Group Challenge called Elements. If successful it will be shown at Festival of Quilts in August.

It is years and years since I have made a piece specifically for a themed challenge. Back when I used to describe myself as a 'just' a quilter and was a member of a couple of traditional patchwork and quilting groups I almost felt a sense of obligation to enter various themed competitions. I often read or heard that it was a way to show support for groups such as the Quilters Guild or to show support for quilt shows such as Malvern. And it probably is. And certainly many people love entering challenges. But, for me, 'forcing' myself to create something was usually a negative experience. Over the years I made some truly horrible pieces as I tried to respond to a theme that did not inspire me. Eventually I said 'never again' and vowed to only work on pieces that come from me. From ideas that I want to spend time exploring. Using materials and techniques that evolve through experimentation and play.

So I was rather surprised when I read the title of the CQ Challenge and realized that it would fit very nicely with ideas that I have worked on over the last couple of years around 'chemistry'. And the relatively small format has allowed me to fit this piece around the two series that I currently have running: Hidden Messages and Ruins. Serendipity! And maybe the beginning of another series??

I'm also really pleased that it is a CQ challenge as the quality of work submitted to previous challenges has been excellent. And the pieces are shown in a gallery setting which is a better fit for me. For those that don't know it the Contemporary Quilt Group is a specialist group within the British Quilters Guild and its' members include many wonderful artists (and friends!). So I know that I will be in very good company whether I am accepted or rejected.

leahhigginsComment
Experiments with time

  Hidden Message 18 detail

Inspiration is for amateurs, the rest of us just show up and get to work' (Chuck Close)

I've been keeping track of the hours I spend on my art for a few years now and used to be pretty happy if I managed 15 hours a week. I used to let myself take 3 hours off that target for every night I spent away from home with my day job. And I'd take 6 hours off that total if I was busy with other stuff one day at the weekend. As you can imagine there were weeks when 'art' owed me time!

That all changed last year. Building a studio space has given me somewhere so lovely to work why would I want to be anywhere else. And then I read the 'War of Art' and 'Turning Pro' by Steven Pressfield and decided that I was ready to turn pro. So my weekly target is now 20 hours per week. If I'm away from home for 1 or 2 nights my target is still 20 hours. If I have family stuff happening at the weekend my target is still 20 hours. If I loss a day to a migraine my target is still 20 hours. (I even got up early on Christmas Day to get a couple of hours in!!). If I know I'm going to be travelling a lot or otherwise tied up with the day job I 'book' myself a holiday from the studio. And I record my hours on a planner pinned to the cupboard where I store the studio biscuit tin so I am guaranteed to see how I'm doing.

I've also paid attention to how easy or hard it is to walk out to the studio each evening or each day. And to the type of activity I prefer to do.  I noticed that I was much more relaxed and more productive in the spring and summer as the evenings got longer. Although the studio is only 20m from the house it takes an extra effort to go out to the studio on winter evenings when it is dark, cold and wet. In the spring and summer I really love doing wet process, in the autumn and winter I prefer to stitch. I also noticed that I was particularly productive during the 4 long weekends we have due to public holidays. And that my productivity was disproportionally bigger than the extra hours would suggest. I found that I could give myself 'permission' to sit in the garden or even have a nap and still produce some great work.

So this year I am experimenting with time. I know that if I take a weeks holiday from my day job to spend in the studio I will run out of energy by the Thursday and won't achieve the hours that I would expect. Instead this year I am taking 5 Mondays off in April and May. Combined with the public holidays that means I have 8 long weekends across April and May.  I spent time in March when I couldn't be in the studio thinking about what I want to achieve over this period and it is pretty ambitious. I have set myself the goal of completing 4 more Hidden Message pieces ready for the Etcetera exhibition in September. I am also going to complete the After Image piece for the CQ Challenge. And I'm going to create more cloth for the Ruins series. I want to complete 2 fairly large Ruins pieces by end September so need to get all the textile printed by the end of May. And I also want to finish Ruins 3.

The Easter weekend was the first one. I put in a great 15 hours spread across 3 days and spent the fourth day starting some long overdue decorating. I finished the Ruins 3 piece. I stitched a Hidden Message piece (see photo below). And I did not feel in the least bit resentful when I was up a ladder painting a wall. So far so good!

Hidden Message 18

Back in the studio

After Images sample At last my travels are over (for now) and I have been able to get back into the studio! There is not a lot to be said for sitting in a plane for 14 hours but it did mean that I had thought through exactly what I wanted to do to one of my 'happy accident' discharged pieces of cloth. Looking at the darkest piece had reminded me of fragments of old sepia and black photographs; layers of our lives, past and present, the memories that stay with us and those that fade away. So I gave the cloth the working title of 'After Image'.

My first degree is in Chemistry and I have always enjoyed working this into my art. I have made a couple of pieces inspired by Copper in the past but this new piece of cloth got me thinking about the fact that we all share the same chemistry. Over 99% of the human body is made up of just 6 elements: Oxygen, Carbon, Hydrogen, Nitrogen, Calcium and Phosphorus. From this finite set of elements are created infinite possibilities.

So I began by adding a layer of fine print onto the discharged squares using three thermofaxes - one of the periodic table and two of different molecules. I have had these for a while but have never found the perfect place to use them until now! I then created a temporary screen and printed larger grey 'water' molecules across the surface of the fabric. (The human body is made up of 57% water.) All this was done using screenprinting inks so the cloth dried quickly.

The Contemporary Quilt group challenge for this summers Festival of Quilts is called Elements (how convenient!!) and has a size requirement of 45 x 80cm. I was able to cut this and 4 small pieces approximately 20 x 20cm from the cloth. I have used the small squares to sample different stitching ideas. My ideas evolved as I moved from one to the next. In the first one I stitched different size circles and connected them with straight lines. I liked the idea but wanted something less 'rigid'. So in the second piece I tried to replicate one of those diagrams that show flight routes between airports. I stitched curved lines spreading out from one point. Sometimes stopping, sometimes becoming a hub for more lines. Having stitched the piece I printed small white circles on the hubs. I liked this piece a lot. In the third piece I tried adding chemical symbols in different ways. I liked the H and the N but neither where obviously chemical elements. So in the fourth piece I stitched a more detailed symbol which included the name of the element as well as it's symbol. Then I added a set of curved lines. I love this and now know how I will stitch the full piece! I am so glad to be back in the studio!

All four After Image samples


leahhigginsComment
Transitions - the first exhibition by Etcetera

Hidden Message 13 I am very pleased to announce the first exhibition by Etcetera at the Platform Gallery in Clithero, UK between 12th and 27th September 2015!

Grafitti 1 by Helen Conway

Etcetera is a group of 7 textile artists (including me). The other members are Linda Bilsborrow, Julie Bunter, Helen Conway, Isobel Holland, Magie Relph and Sandra Wynam. We formed about two years ago with the specific intention of supporting and encouraging each other as we strive to develop as textile artists. An important part of that is exhibiting in 'white space' galleries alongside artists using other media. We are a diverse group so chose the broad theme of Transitions for our first exhibition. It has been interpreted in very different ways by the group members. I will be showing pieces from my Hidden Message series which are inspired by the cultural transition taking in place in China today.

You can find more about us on our website www.stitchetcetera.com

You can find more about the Platform Gallery at Platform Gallery

Address: Station Road, Clithero, BB7 2JT

Telephone: 01200 425566

Opening times: Monday to Friday 9am to 5pm, Saturday 10am to 4.30pm


leahhigginsComment
Happy Accidents

Printing with discharge paste then thickened dyes My day job involves quite a bit of travelling and there are periods when I have a series of trips week after week that keep me out of the studio. The month of March is one such period with two trips to Germany, one to China and one within the UK. And, of course, each trip requires some level of preparation further eating into studio time. So I came back from my week at Rydal Hall knowing that I should not expect to do anything in the studio for the next 4 - 5 weeks. I took the opportunity to put my sewing machine in for a service and had a good tidy up in the studio. And tried not to feel bereft!

But last Saturday I realized I could, if I was quick, squeeze in a bit of bench work so I decided to do some more experimenting with discharge. I had a lovely 2 hours laying down discharge paste first then over printing with thickened dyes. And the next morning I found time to iron then wash the pieces. I was getting a LOT of colour coming out of the fabric as I rinsed it. And then realized that I had printed onto fabric from my 'scoured' box rather than from my 'soda soaked' box! Oh boy, if I could have kicked myself I would! I quickly added soda and hot water to the rinse bucket in the hope of salvaging something. The results can best be described as pale and vaguely interesting.

Happy accident number 1: forgetting to use pre soda soaked fabric!

This is the first time I have ever made this mistake and I was really annoyed with myself so I stayed up late on Sunday evening repeating the work on pre-soda soaked fabric thinking that I could find enough time on Monday evening to iron off and rinse the pieces. But the day job intervened and it was Tuesday evening before I got back into the studio. I was horrified to find that the pieces of fabric had already started to discharge leaving areas of yellow, green and purple! I have had pieces discharge when I have hung them outside in the sun but I've this had happened with the fabric sat on the bench.

Fabric printed with discharge paste then thickened dye then left for 2 days during which the discharge process started

I ironed the fabrics until the fabric felt like cardboard but couldn't get the colours to change - I really thought that I had ruined yet more fabric. But I figured that I might as well rinse them out and was wonderfully surprised when all the 'nasty' colours washed away leaving a couple of really gorgeous pieces of fabric. I had used black and dark brown. In one piece (pictured above) I used full strength colours which have discharged to indigo and a dark sepia. And in the piece below I used medium strength colours which discharged to pale blue greys and beiges. In both pieces there is a lot more detail and texture than I have seen in my previous experiments. Could this be because I left them so long? Maybe. I'll have to do some more experimenting to find out.

Pale version using medium strength thickened dyes over discharge paste

Detail from pale piece

Detail from dark piece

leahhigginsComment
Retreat at Rydal Hall

Last week I spent a glorious 5 days in the company of 13 other members of the Contemporary Quilt Group at Rydal Hall in Ambleside in the Lake District. The group has been meeting for an annual retreat for several years now. There is a core of about 9 or 10 plus 'part-timers' like me who attend every couple of years. This year the group included Linda Bilsborrow, Janet Edgington, Julie Bunter, Ruth Axson, Pauline Stubbings, Linda Young, Judy Fairless, Jean Marshall, Karen Hurrell, Millie Thomas and Mags Ramsay. We were joined in the evenings by Gillian Travis and her friend Annie. The group has been using Rydal Hall for several years. It was chosen because many of the members wanted to spend their afternoons out walking. It is also well placed for lots of retail therapy with great art shops in Ambleside and neighbouring towns. I am not a walker and spent most of my time indoors stitching. I did venture out to the Rydal Hall Tea Rooms for lunch each day. A walk of maybe 20 metres! But well worth it for the soup, the cakes and the views of Rydal Brook which was running very fast thanks to heavy rain during the week.

Rydal Brook in full flow

The Hall itself is quiet and welcoming. The group rate gave us the use of the Old Kitchen which is a lovely, well lit room. Although it was a bit of a squeeze setting up work tables for 12 people! The photo below was taken early on Tuesday morning whilst the room still looked reasonably tidy. It didn't stay that way. Being a retreat meant we were all working on our own pieces at our own speeds. Some used the week to work into sketchbooks, others used the week to start new projects. The activities were really varied from machine quilting through to monoprinting. And all done in great company, sometimes quiet but many times accompanied by laughter. A great getaway from our daily lives.

The Old Kitchen set up ready for a days work

Although we worked on our own pieces most of the time we did stop each day for a group activity / talk. I gave a short talk on dyeing fabric using ferrous sulphate solution and tea. This is something I have tried several times with mixed levels of success but it can produce some wonderful results.

Fabric dipped in ferrous sulphate solution then in strong tea

Fabric dipped in strong tea solution then in ferrous sulphate solution

'Rust dyeing' seems to be an 'in' thing at the moment. Several of the ladies had participated in workshops with Alice Fox and others and brought some of their work to share with the group.

Work in progress by Pauline Stubbings

Work in progress by Ruth Axson

I spent my week working on the new Hidden Message pieces. It was good that I had got the composition of 3 pieces completed prior to the retreat. The lack of a design wall made it much more difficult to judge whether new compositions 'worked' or not.  It also made it difficult to gauge the success of the quilting. I returned home with 4 pieces completed and 1 in progress. They are currently pinned on my design wall and, overall, I am delighted with the outcome of the retreat.

Back to the real world tomorrow (unfortunately)!

leahhigginsComment
Building the next Hidden Message pieces

Having printed most of my fabrics I have now started to make the next Hidden Message pieces. I'm never quite sure what to call this process - I guess it could be called collage but the regularity of the pieces seems to fit better with the word 'construct'. And construct seems more appropriate given that I am building cityscapes. Whatever you call it I love this part of the process. For me it involves lots of sitting and looking at the design wall, lots of pinning and unpinning bits of fabric, drinking lots of coffee and eating too many biscuits! I spent about 8 hours constructing 3 pieces. Creating my skyscrapers

I fused acrylic felt to cotton backing fabric and cut out 3 pieces 14 x 32 inches (although the finished pieces will be 12 x 30 inches). I then started to make my skyscrapers using freezer paper as guides for ironing under edges.

Layering the skyscrapers to build a cityscape

I pin the pieces in place as I go and pin the whole piece to my design wall at regular intervals. What looks good on the bench doesn't always work when you try to look at the piece as a whole from a bit of a distance. I didn't really have a plan in terms of how I wanted to use the fabrics - the 3 pieces sort of evolved together. I have ended up with two paler 'day' pieces and one which feels more like a night scene. I plan on making more of these but will spend time quilting these first - stitch on these pieces will spark new ideas for the next pieces!

Cityscapes, one at night and two during the day

leahhigginsComment
Printing the next Hidden Message fabrics

So having sampled on similar coloured fabrics I spent the weekend using thermofax and screen printing to create a group of gorgeous fabrics ready for the next set of Hidden Message pieces. I started with a hand dyed 21 piece colour family. I used a single screen on some. Others I used a couple of screens. Some were discharged. Some were printed with screen printing inks. Some were over printed. I still have 7 pieces of fabric to print but I'm pretty happy with the results so far. Printed hand dyed colour family

Printing - marking out fabric with pins and thread so that I can see where to print

Printing - using kitchen towel to mask areas to stop 'ghosting'

Printing with discharge paste - activating with an iron

Printed fabrics drying in the studio

leahhiggins Comments
Sampling for the next Hidden Message pieces

I have completed 13 pieces in the Hidden Message series to date but none of them are quite right for an exhibition I have later this year with the Etcetera group. The venue is relatively small so we each only have limited wall space. I thought that the last two pieces I made would be OK but woke up one night realizing that their scale was just not going to work. So with only 8 months to go I decided that I needed to start from scratch and work smaller. I dyed some more fabric over the Christmas holidays - that was the easy bit. And then I started to think about layout and construction methods. I did spend a lot of time working in a sketchbook when I did City and Guilds but the habit never stuck. Instead most of my 'working out' happens in my head with the odd scribble on bits of paper. This time though I couldn't quite figure everything out so made a paper mock up of how I thought the piece could look. The series is all about censorship in modern China and takes its form from the skyscraper filled skyline in Shanghai. So I made a cityscape using cut up Chinese newspapers. No idea what any of the text meant but loved the texture.

Sampling Paper Skyscrapers (12 x 30 inches)

This told me that I needed some smaller scale prints than I had used in the earlier pieces so I had a series of thermofaxes made featuring barred windows and Chinese text. Although the text will read more as texture than clear text it does have meaning - it is a list of types of censorship used in China (and, unfortunately, in many other countries). I trialed these screens on a set of fabrics left over from an earlier Hidden Message dyeing session. I experimented with thickened dyes and with screenprinting inks to achieve different levels of clarity. I also used discharge paste on some pieces.

Printed and discharged fabrics

And then I started to build my skyscrapers. I stitched the first pieces around their 'exposed' edges then with parallel vertical quilting. Looked OK but lacked some movement? Maybe. So I switched to just stitching pieces down around their edges. Once the skyscrapers were built I hung it on my design wall and made a cup of tea. And sat and starred. And gave up for the night but when I got into my studio the next evening I knew that I wanted to add parallel diagonal lines - as if the stitch were rain pouring down on the city.

Printed and discharged fabrics collaged

I haven't completely quilted the piece. I don't need to. The sampling process has given me enough understanding to know how to print my fabrics and how to build the city. I am already thinking of different variations on colour placement and on adding stitch. And now I am ready to start work - I need to have 5 pieces (that I am happy with) by the end of August - easy!!

Stitched sample

leahhigginsComment